
How to use Dailycious with Avid Media Composer
Sometimes the dailies are managed by the assistant editor. No problem. In this case, it is perfectly possible to export the necessary files (videos and metadata) from Avid Media Composer. We will explain how.
Introduction
In case you already know how dailycious basically works, please go directly to the next chapter (1 | Before starting).
However, if you have never used Dailycious, please read this first. We will try to explain the solution very quickly :
- Dailycious is a dailies player app that associates metadata to video clips in order to generate automatic playlists.
- It consists of a Manager and a Player. You will need a license to use the manager and you will need a manager to play your dailies in all Dailycious Player apps you want. In any case, you will need a license...
- Dailycious manager app allows its user to import files,upload files to our cloud platform, invite other users to watch the dailies, set up watermark and so on...
- Dailycious Player is the app for dailies watchers such as production, direction, crew...
To make Dailycious work, you have to feed it with metadata and video files. Usually the metadata can be exported as XML files when using Pomfort Silverstack or ALE when working with AVID Media Composer, Colorfront ExD or Baselight / Daylight. Note that you can export your metadata with a soft and your video files with another (for instance exporting your metadata with silverstack and render your clips with Resolve can be a good option).
In our case, that is to say exporting files from Avid Media Composer to Dailycious, you will need an activated Dailycious Manager.
_
1 | Before starting
In this article we suppose that you already know the basics of Avid Media Composer (media ingest, audio sync, subclips...) as we will only explain how to deal with dailies and metadata exporting.
A few notes before starting with exporting your files from Avid Media Composer :
- Dailycious is working based on individual clips so forget about old school single sequence containing all your shots. What makes Dailycious powerful is its ability to search and sort clips which is possible only if you have individual files.
- If you want to export your files and metadata from Avid Media Composer, you will need to export two types of files : video files and ALE containing all the necessary metadata.
_
2 | filling user infos metadata in Avid
Dailycious is compatible with ALE (Avid Log Exchange) files. Either ways, you will need to fill the "shoot date" & "Tape" fields.
To allow relinking, the clipname needs to appear :
- either in the name field
- or in the tape field
- or in the Camroll field*
- or source file field (extension is permitted)
That is to say, you have plenty of solutions to make it suits your workflow.
_
Best Practice
The Camroll solution is probably the safest. Let us explain it to you :
- when importing your proxy files, by bulk editing your subclips, safely store the original clipname into a separate column, which we call Camroll.
- when exporting your ALE, Dailycious will use the value of Camroll to create all the entries (clips)
- when about to render your dailies, duplicate your bin and return the stored Camroll fields back to the name fields, using Bulk Edit again.
_
Framerate
The framerate value is mandatory and has to be filled into a FPS column.
_
Shoot Date
The shoot date needs to be filled following this convention : YYYYMMDD
ex : 20230522
Note that Dailycious will work without Date values filled. However we suggest you to correctly fill this one to get the full potential of the searching tools.
_
Extra Metadata
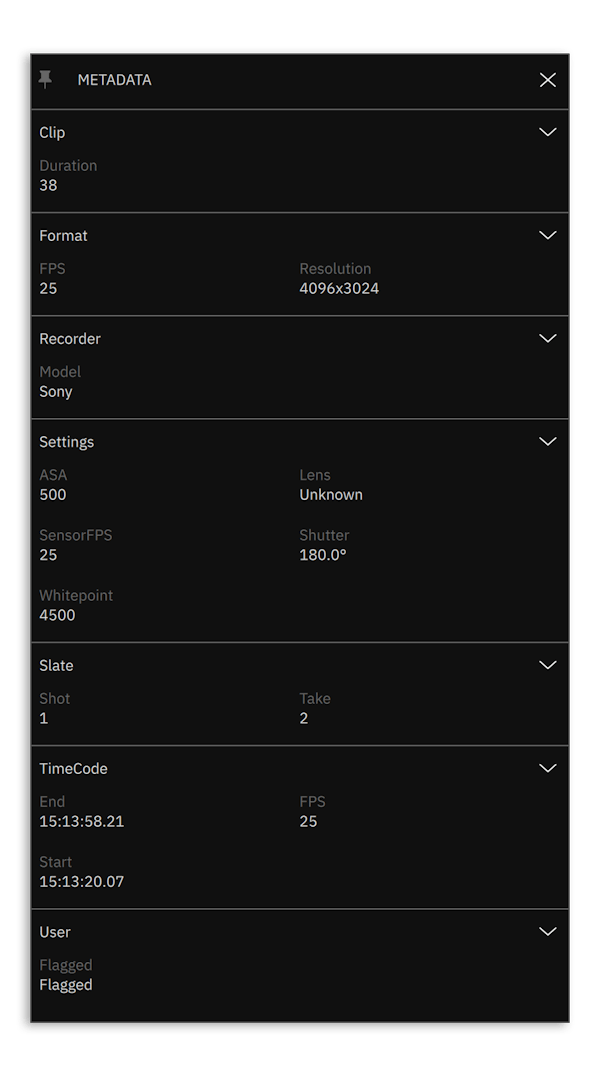
You may be tempted to add additional metadata associated with your files. Don't hesitate to do so! Dailycious can read a lot of metadata which can be displayed by clicking on the "META" button either in the top right menu or at the end of the navigation bar.
3 | the specific cases of user infos in Avid (Scene, Shot, Take...)
In order to transfer the necessary user infos, we have developed 3 solutions. Choose whatever solution suits the best your workflow.
_
[USER INFOS] Option 1 | discreet metadata
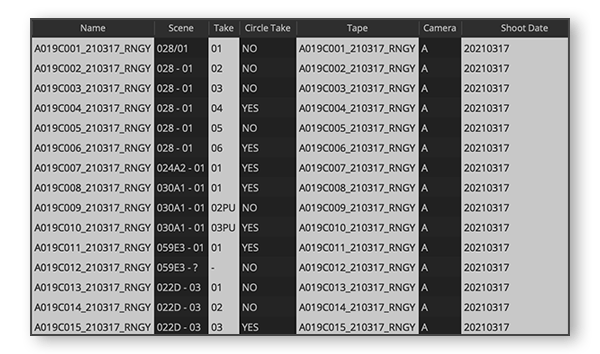
The ALE file contains all necessary fields : "scene", "shot", "take", "circle take"
In this case, the clipname has to appear either in the "tape" field and/or in the "name" field.
By default, the takes are not "circled/selected/flagged". To switch them "circled", just write anything in the "circle take" field but "NO" (which unselect the take). Most users, however, go for a typical Yes.
_
[USER INFOS] - Option 2 | Legacy ALE
The ALE file contains "scene" and "take" (but not "shot')
The separator character is "/". You need to fill the "scene" field based on the following convention : "scene/shot". Dailycious will split the info into scene and shot and so you will have all infos displayed correctly in Dailycious (which also means, all searching and sorting tools should work as expected).
In this case, the clipname can either be filled in the "tape" field or the "name" field.
_
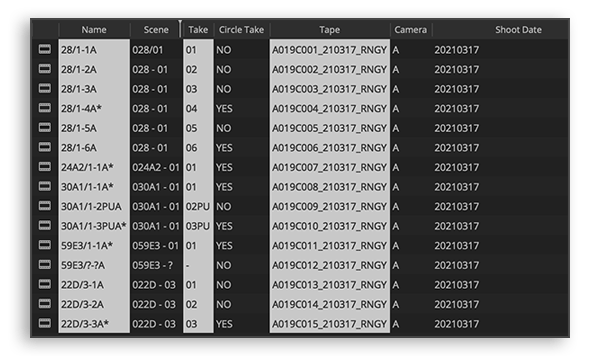
[USER INFOS] - Option 3 | French way ALE
The user infos are written in the name field. No worries! This is how French editors and assistants editors are managing their projects and we worked with them so they can keep their methods. If all the infos are written following the "Scene / Shot - Take * " convention, Dailycious will separate the Scene, the Shot and the Take. The asterisk indicates that the take is selected.
In this case, the clipname needs to be filled in the Tape and/or the Camroll field.
_
4 | Export metadata as ALE
Go to the bin where you have group the dailies you want to export. Make sure the required and desired columns are available in the bin
- ensure all needed metadata is entered in Columns (as only opened columns will populate the ALE)
- Make sure none of the clips are selected
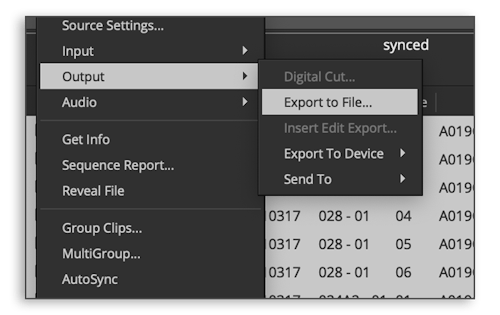
- go to File > Output > Export Bin
- select Avid Log Exchange as Export Setting
_
5 | Export a bin as individual clips
Once you have correctly filled all the desired metadata fields and exported your ALE, you only need to export your video files. Remember the files needs to match the original clipname to relink properly to the metadata (see first chapter of this article).
_
Export files individually
When your synced files are ready, assumed the name field contains the original clipname, go to the bin containing all subclips and select all the entries before selecting export to file ... (Right-click > Output > Export to File...).
_
Export settings
Most users prefer to render either h264 or h265 Quicktime clips. Make sure the framerate of the video is matching the metadata. The color space should be set with Rec.709 (as well as your project) and "keep as legal range" - as long as you received Rec.709 proxy files.
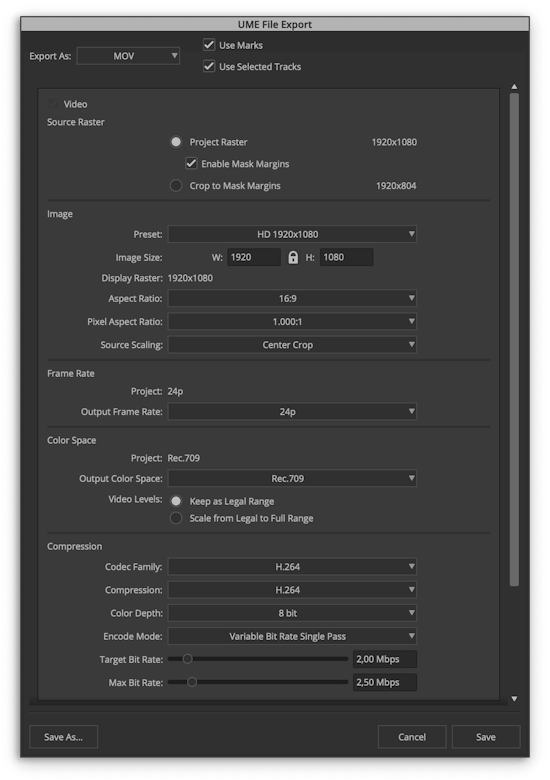
Regarding the Target Bit Rate, we would suggest you to limit it to a maximum of 4,00 Mbps. Usually, a 3,00 Mbps is more than enough.

Of course, it's up to you to follow our recommendations... In case the image does not appear as expected, contact your proxy providers, most of the time the digital lab.
_
Copy the rendered files and ALE into Dailycious Project folder
Your destination folder can be the dailycious project folder but we would not recommand to do so as Dailycious Manager would constantly refresh the database and it may cause issue when playing the media.
Once your files have been exported, copy-paste them into Dailycious project folder. All your clips should now appear in Dailycious Manager. Note that this last operation should not take any time. If it longs more than 5 seconds check if your metadata are absolutely right.
_
BONUS : Add blanking
Select the desired blanking in the format settings panel.
See below the example with a 2.39:1 ratio :
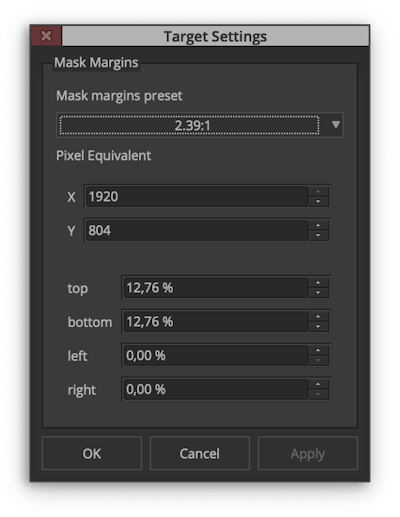
To apply blanking, check the "Enable Mask Margins" box as shown in the image below :
![]()
_
Troubleshooting:
In case your clips don't appear in Dailycious Manager app, check :
- if your clips have the same name as expected : clipname = filename = tapename
- if your ALE is not corrupted
- if you have copied your files in the right folder
_
To sum up :
- ingest all your clips making sure you have the original clipname attached to them
- fill your metadata (Shoot Day, Scene, Shot, Take, Selected Take) and sync audio to your taste
- export the bin ALE after selecting all subclips you want to upload to dailycious
- export the videos with the original clipname as name
- copy video and ALE in dailycious folder
We hope this article has clarified things and will help you streamline your workflow