
How to use Dailycious with DaVinci Resolve
Most of our users work with DaVinci Resolve as their color grading and media management software. Since Resolve is versatile and offers all the necessary tools to export clips and metadata to Dailycious, why not use it? Here is a step-by-step tutorial to help you generate the necessary files.
Introduction
In case you already know how dailycious basically works, please go directly to the next chapter ( 1 | add all the clips into a timeline).
However, if you have never used Dailycious, please read this first. We will try to explain the solution very quickly :
- Dailycious is a dailies player app that associates metadata to video clips in order to generate automatic playlists.
- It consists of a Manager and a Player. You will need a license to use the manager and you will need a manager to play your dailies in all Dailycious Player apps you want. In any case, you will need a license...
- Dailycious manager app allows its user to import files,upload files to our cloud platform, invite other users to watch the dailies, set up watermark and so on...
- Dailycious Player is the app for dailies watchers such as production, direction, crew...
To make Dailycious work, you have to feed it with metadata and video files. Usually the metadata can be exported as XML files when using Pomfort Silverstack or ALE when working with AVID Media Composer, Colorfront ExD or Baselight / Daylight. Note that you can export your metadata with a soft and your video files with another (for instance exporting your metadata with Silverstack and render your clips with Resolve can be a good option).
In our case, that is to say exporting files from Resolve to Dailycious, you will need an activated Dailycious Manager.
_
1 | Add all the clips into a timeline
First, open Davinci Resolve.
As Resolve works with timelines contrary to Silverstack or Daylight, you will need to create a timeline with the clips you want to play in Dailycious. After having them imported into the media pool, append all the clips into a new timeline. You can work with a shooting day or a card basis. To avoid unintentional cutting, we prefer to select all the chosen clips and select "create a new timeline from the selected clips" by right-clicking on these clips.
Setting up the Reel Name
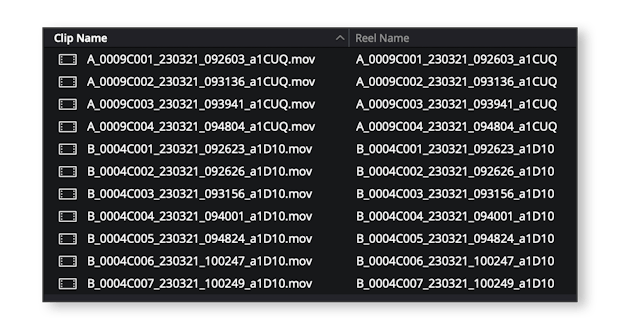
Before exporting anything, make sure your set up the reel names assistant correctly (it will save you a lot of time when conforming to native files as well). Go to project settings and then to General Options. Check the box for reel names assisting and "Source clip filename" in the list of options. This should work with most cinema cameras from ARRI and SONY. For RED cameras, see the note below.
It should appear like that in your media pool :
RED Cameras
For RED cameras, please select "embedding in source clip file" instead. If you choose source clip filename, you will get a "_001" suffix that will prevent you from linking to your video files in Dailycious. This is a common mistake that new users often make.
_
2 | Fill the required metadata
When you are in the media or editing tab, you will find the "metadata" panel which can be opened by clicking on the Metadata button in the upper right corner. We can only encourage you to fill the following metadata as Dailycious will work the best this way :
- Scene
- Shot
- Take
- Good Take
- Shoot Day
You can add metadata to multiple clips by selecting the clips you want to attach data to and making sure to click "Save" at the bottom of the page before taking any other action.
Scene / Shot - Take*
Good Take in Resolve is the equivalent of the Flag in Silverstack or the Circle Take of Daylight. In Dailycious, you can filter the clips so that only selected takes appear. Thus, you can export all your clips and let Dailycious hide the unselected takes and so having the choice to show all the takes when require.
Shoot Day
To be able to sort your clips according to the accurate shoot dates when back in Dailycious Player, make sure you fill correctly the Shoot Day field. The correct structure for the date is following this convention : YYYY-MM-DD. In case you have missed it, the clips would appear in a default date, that is to say "xxxx".

Other metadata
All the other metadata you may fill will be displayed in the player when opening the "meta' panel. Each clip will have its own attached set of data.
In case of mistakes with your data, no worries! You can modify and re-export your ALE at any time : Dailycious will always update the database according to the last data it get.
_
4 | export your ALE
Once you are happy with your metadata, enter your timeline and export the ALE from it. Note that you will need to enter the timeline to be able to perform this. The ALE export is not available when not in the selected timeline. See below where the tool is hidden.

There is no option when exporting ALE from Resolve so don't waste your time looking for some.
_
5 | export your clips
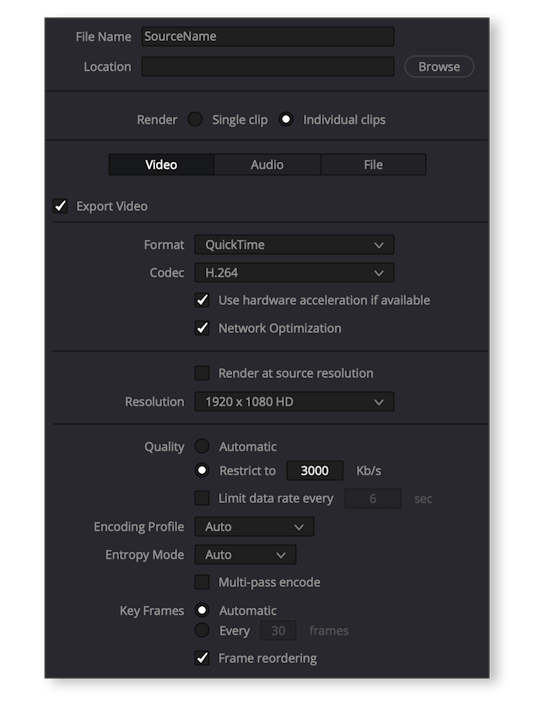
You now just need to export your video clips. Open the timeline you want to export the clips from. Go to delivers and select the destination of your choice.
Here are the settings we usually recommand to our users :
Your destination folder can be the dailycious project folder but we would not recommand to do so as Dailycious Manager would constantly refresh the database and it may cause issue when playing the media.
Once your files have been exported, copy-paste them into Dailycious project folder. All your clips should now appear in Dailycious Manager. Note that this last operation should not take any time. If it longs more than 5 seconds check if your metadata are absolutely right.
Troubleshooting:
In case your clips don't appear in Dailycious Manager app, check :
- if your clips have the same name as expected : clipname = filename = reelname
- if you correctly set up the reel name assistant
- if your ALE is not corrupted
- if you have copied your files in the right folder
_
To sum up :
- add all your clips in a timeline
- export all your clips individually using the source filename as clipname ; codec h264 / h265
- export the timeline ALE after having filled all the required metadata (Shoot Day, Scene, Shot, Take, Good Take)
- copy video and ALE in dailycious folder
We hope this article has clarified things and will help you streamline your workflow